Audi TT Rocker Cover Gasket Replacement
What is the rocker cover gasket?
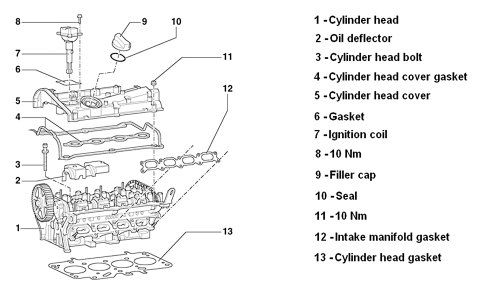
Every engine has a head that contains the camshafts, valves and ignition system. The rocker cover or cylinder head cover as it is sometimes known, covers the top end of the engine. Oil circulates the head when the engine is running so a gasket is used to seal the cover and the head to prevent oil from escaping.

Why would you need to replace it?
Over time the gaskets begin to fail and seep oil. This is common on a lot of cars and is usually a simple job of replacing the old gasket with a new one.
What happens if I do the job wrong?
I recently heard a story of a garage replacing a seeping gasket on a 1.8T engine with silicone liquid sealant. While this may not seem like the end of the world, it ended up totalling the engine.
The silicone sealant used was not temperature resistant and far too much was used. This resulted in chunks of the sealant breaking away, blocking oil channels and collecting at the bottom of the oil collector in the sump. The oil starvation caused by the chunks of sealant caused the piston rod bearing to prematurely wear to the point that it disintegrated and caused significant scoring on the crankshaft. The only way to fix it was to recondition the crankshaft, put in a new bearing and possibly a new piston if damage was done to it.
So the moral of the story is to read this guide if you’re planning on replacing the rocker cover gasket, or at least read the manual before doing it :)
What you need:
- Replacement Rocker Cover gasket (part no. 058198025A)
- Audi OEM high temperature sealant (part no. D176404M2) and a sealant gun
- 13mm, 10mm and 16mm long-reach socket
- T39 torx socket
- Flat-head screwdriver
- 1/4 inch Torque wrench capable of torqueing to 10Nm (optional)
Method:
Removal:
- Remove the cover on top of the engine if you have one. This is usually fastened by two philips head bolts.
- Remove the strut brace. This can be done by removing the three 13mm nuts at each suspension strut top on either side as well as as two nuts along the brace itself.
- Remove the charge pipe. This can be done by removing the two 13mm nuts holding in the charge pipe fasteners, loosening the bottom intercooler pipe Jubilee clamp, the two breather hose clips (if the charge pipe hasn’t previously been removed, OEM single-use clips will be holding in the breather hoses. You can break them and replace them with Jubilee clamps when refitting) and the Jubilee clamp for the hose to the top of the turbo (this may be obstructed by heat shielding). Then pull the charge pipe out.
- Remove the charge pipe mounting bracket on the firewall side of the engine to clear access to the rocker cover. There are two hex bolts under the bracket mounting it to the head of the engine. The bracket bolts on my car were rusted entirely and I had to drill them out to get the bracket off. I replaced them with standard galvanised 10mm M6 bolts and locking nuts.
- Move the N249 assembly out of the way. This sits on top of the rocker cover towards the gearbox side of the engine. There is a metal bracket that mounts directly to the rocker cover by four nuts to move it out of the way. You may find that an N249 delete has been completed on your vehicle too in which case this step is not needed.
- Remove the bar attached to the back of the rocker cover with heat shielding attached. It is attached by 4 T39 bolts.
- Disconnect the coilpacks. Pull the tab on each of the connectors back towards the firewall and slide the connector off. Be careful not to break the tabs when doing this. Two of the coilpacks were cable-tied onto the coilpacks on my car and I replaced all of the connectors. There is an earth cable to be removed with the ignition loom too that is attached by a single 10mm bolt. The ignition loom can then be moved out of the way.
- Unclip the timing belt cover held by two clips. There is no need to fully remove it.
- Remove the spark plugs using a 16mm long reach socket. It may also be a good time to replace your spark plugs after refitting if they need changing.
- Remove the breather pipe on the gearbox side of the rocker cover. It may have a single use clamp or a Jubilee clamp.
- Remove the 9 10mm rocker cover nuts.
- Use a screwdriver to pry the rocker cover up and out of its seat. You should now be able to remove the rocker cover by wiggling it.
- Remove the gasket by lifting it up with a flat-head screwdriver.
- Optionally you can degrease and clean the rocker cover before refitting.
- Now is a good time to inspect the condition of the head. Check for any areas of dirt build-up that could block oil channels. There should also be cam covers on the intake camshaft. Check that the cam chain has not stretched and feel tight.
Refitting:
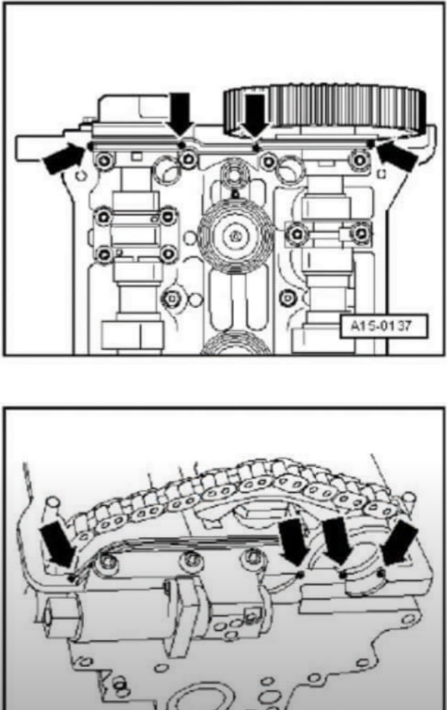
- Fit the OEM sealant to the sealant gun and place a small amount of sealant only on the points where the gasket bends. See the photo attached.

- Leave the sealant for 5-10 minutes for it to begin to harden before placing the new gasket in. There is no sealant needed in the spark plug hole areas.
- Ensure that the gasket is seated correctly in its trench around the head.
- Seat the rocker cover back on top of the new gasket.
- Hand tighten the rocker cover nuts. Start by tightening the middle-most nut then the diagonals in either direction followed by the nuts directly above and below and the nuts to either side of the centre nut.
- Torque the nuts to 10Nm with the same torque pattern outlined in step 5. If you don’t have a torque wrench, tighten until you just feel the nut beginning to resist your force. It doesn’t take much to tighten them down.
- Refit everything else that was removed.
